Friday, December 23, 2011

Project Organization Part 2

Organization is an ongoing task. I haven't quite mastered it, but I'm getting better. After trying several ribbon storage containers, I have finally found one that works! The best part was that it was an old container from my garage. That means this idea cost me $0.

My second idea is for the bags in your closet. Sadly, I didn't invent this idea. I probably saw it while browsing the net. We recently changed the shower curtain in our guest bathroom and no longer needed these gold shower curtain hooks. I am now using the hooks to hang bags in my closet. Again...this project cost me $0. Yippee!


Pin It

Thursday, December 22, 2011

Who Doesn't Love Ruffles?

I finally made some ruffle pants for Kayden. They are Christmas print to match her ribbon Christmas tree shirt. I watched a youtube video and paused it as I followed along. I can't wait to make my next pair!


Here is the video. This lady has the BEST boutique ruffle pants tutorial!


Update: Here is a pair of gingerbread ruffle pants I made using the same tutorial.


Pin It

Wednesday, December 21, 2011

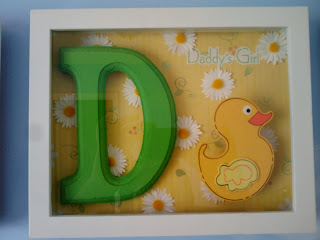
Nursery Shadow Boxes

These are shadow boxes from  my daughter's nursery. Each box has a letter theme. Example: N is for numbers and necklace. My husband and I had a blast finding the items for each letter. I love that she can use these for years to come.


Pin It

Girly Girl

Having hair accessories is a must for girls. Here is a headband holder, bow holder, and some bows I made for Kayden.


Pin It

Cookie Collage

Here are a few cookie designs I have made:


Cookies for Baby Will


Pin It

Tuesday, December 20, 2011

The Best Gifts

This is a tray that I received as a Christmas gift from my students. The reindeer were made from their fingerprints. Then each student signed their name on the back. This is one of my favorite gifts!


Pin It

Snap, Crackle, Pop

Get into the spirit with these holiday shaped Rice Krispie treats. After mixing in the cereal, spread the mixture onto a shallow cookie sheet. Remember to spray your cookie cutters before using.
Use decorative sprinkles for an added touch!


Monday, December 19, 2011

All Things Tiny

I'm pretty sure that I have taken thousands of pictures of my daughter since she was born. It has been almost a year and my husband and I enjoy looking back at the older pictures. We are amazed by how much she has changed and know this is just the beginning. As I was moving and deleting photos, I came across this wooden block photograph. So little, so small, so sweet...who can resist tiny fingers and feet?

Sunday, December 18, 2011

Project Organization

I love being trying to be organized...I just hate the process it takes to get organized. Since I'm on holiday break, I decided to organize a few rooms in my house. First on the list is my closet. I am revamping how I organize my shoes. This is how my shoes were organized a few years ago. I used plastic shoe boxes from Wal-Mart and taped pictures of each shoe on the outside of the box. Due to fallen off pictures, a yard sale, a few donations to Goodwill, and new shoe purchases, it looks a bit different now. 
Wish me luck!! I will post an updated picture soon.

Update: I finally finished reorganizing my closet. It looks pretty similar to the original, but hopefully I can go 5 years (instead of 3) before having to redo the pictures.


These pictures were taped using double sided tape to the inside of each shoe box. The pictures were printed on copy paper. I thought about using photo paper, but didn't have enough. The photo paper would work well if you placed the pictures on the outside of the shoe boxes. You may want to use large printer labels. I also placed the shoes on a shelf instead of on the floor. There were a few technical difficulties when trying to print off the pictures, but overall this was an easy project.
Cost: $0
Time: 2 days
I'm glad this project is complete!


Pin It

Saturday, December 17, 2011

More Baby Feet

Who can resist little baby feet? Any craft with cute baby feet is instantaneously A-DOR-A-BLE!
I recreated this precious Etsy Ornament. This is how I did it.

Materials:
  • Frosted white ornament
  • Coral Martha Stewart glitter (Try Blue Sapphire glitter for a boy)
  • Mod Podge
  • Ink pen (to draw footprint)
  • Small paint brush (about a 1/2 inch or smaller)
  • Sweetheart silver glitter stickers by Sticko
  • scrap paper
  1. Outline the footprints using the pen (a pencil might work too)
  2. Using the paint brush and Mod Podge, fill in your outline (work quickly or you may choose to do one foot at a time)
  3. Sprinkle glitter over the Mod Podge and shake excess onto a piece of paper
  4. Let dry(15-20 minutes) and clean off your brush.
  5. Use the dry brush to brush away excess glitter. ( Repeat steps 2-5; if needed)


 For the back:
  1. Find the middle of the ornament and place stickers from the inside and work out. (I started with the letters "y and d" for Kayden.) 

These would make a great baby's first Christmas gift.

Pin It

Santa Claus is coming to...

a tree near you! This is my version of the Santa's belt ornament. Just use the Pledge Glitter Ornament and hot glue a felt belt around the ornament. I used Elmer's glue and silver glitter for the belt buckle. Simple and easy!


Pin It

You had me at...

BLUEBERRY! I love blueberry anything. So after viewing a picture of this breakfast cake, I knew I had to try this recipe.


My 2nd grade teammates are so awesome. One of us brings breakfast each Friday and last Friday was my day. I always get so nervous when my week comes up, but this recipe didn't let me down! This buttermilk blueberry breakfast cake was a hit and super easy to make.

Pin It

Thursday, December 8, 2011

Glitter Me


If you didn't know already...I LOVE glitter? Glitter just makes everything better (I have probably said that a hundred times before, but it's true!)...especially Christmas ornaments! I have to thank Amy E. for sharing this great idea. This is the simplest way to decorate glass Christmas ornaments. The best part is that all the glitter stays inside of the ornaments!  I can't wait to try some ornaments with my Martha Stewart glitter set!
Supplies:
clear glass ornaments
Pledge Floor Care
plastic wrap (not pictured)
Glitter


  1. Carefully squeeze the top off of the ornament
  2. Pour the Pledge inside of the ornament (see photo)
  3. Cover the opening with plastic wrap and swirl the Pledge to coat the inside of the ornament
  4. Pour the excess Pledge back into the container
  5. Sprinkle the glitter inside the ornament
  6. Lightly shake the ornament to coat the inside of the ornament with glitter
  7. Let dry (30 minutes per the bottle), carefully squeeze the top back on, and enjoy!


Need more help? Watch this tutorial.

Pin It

Sunday, December 4, 2011

A Little Touch of Glitter

Glitter really makes everything better!  These Dollar Tree vases were upgraded with a little glitter, double-sided tape, a candle holder, and ribbon. Have you found any dollar gems?


Pin It

The Most Wonderful Time

I really think the time between Thanksgiving and New Year's Day is the most wonderful time of the year. I get to catch up with family and friends, we have breaks from school, and I get time to craft adorable holiday themed clothing. Here is one version of a ribbon Christmas tree shirt:

Pin It

Saturday, December 3, 2011

I Love Bows

I really enjoy making bows. I guess because they are quick, easy, and I know KayBear can use them next year. After finding these gingerbread buttons, I knew they would be a great addition to the gingerbread outfit I made last week. Here are my Gingerbread Button Bows:


Pin It

Fun Finds

A couple of weeks ago I made these ornaments that were covered with tissue paper. Although the Dollar Store paper was cute...Hobby Lobby has a fabulous selection of tissue paper. Check out their variety!
 
Pin It